
# gulp
# gulp 编译项目
日常进行小程序开发,遇到的问题有:
- 如果在微信开发者工具进行开发的话,效率低;
- 不支持 less css预编译器 ;
- autoprefixer ;
- ...
考虑到小程序是多页面应用,我们只要在 src 目录添加小程序初始化时所需要的相关配置文件,然后通过 gulp 将 src 下的代码搬移到 dist 打包目录即可。
# 项目结构
└───gulpTask 目录:主要存放 gulp 代码逻辑
| 	└───baseConfig.js // gulp 路径和 blob 配置信息
| 	└───clean.js // 清理 dist nodejs 脚本文件
| 	└───taskControler.js // gulp 任务定义
|───src
| 	└───common // 公共代码
| 		└───less
| 			└───...
| 		└───js
| 			└───...
| 	└───components // 组件
| 			└───...
| 	└───pages // 页面
| 			└───...
| 	└───router // 路由
| 			└───router.js // 路由处理逻辑
| 			└───routerPath.js // 路由表
| 	└───api // 请求数据接口统一处理
| 			└───api.js
| 	└───http // http 网络请求
| 			└───baseConfig.js // 基本配置
| 			└───devConfig.js // 开发基本配置
| 			└───prodConfig.js // 生产基本配置
| 			└───request.js // 请求处理逻辑
|	└───app.js
|	└───app.json
|	└───project.config.json
|	└───sitemap.json
└───.eslintrc // eslint 配置
└───.gitignore // git 配置
└───gulpfile.js // gulp 主入口
└───package.json
└───README.md
# gulp 配置文件 baseConfig.js
将 gulp 相关路径和 blob 配置信息统一在 baseConfig.js 中进行配置。
const path = require("path");

const srcPath = path.resolve(__dirname, "../src");
const distPath = path.resolve(__dirname, "../dist");
const isDev = process.argv.includes("--development");

module.exports = {
  isDev, // 当前环境
  srcPath, // src 源路径
  distPath, // dist 编译目标路径
  basePath: [
    srcPath
  ],
  otherPath: [
    srcPath,
    `!${srcPath}/**/**/*.less`,
    `!${srcPath}/**/**/*.wxml`,
    `!${srcPath}/**/**/*.json`,
    `!${srcPath}/**/**/*.js`,
    `!${srcPath}/static/icons/*.jpg`,
    `!${srcPath}/static/icons/*.png`,
    `!${srcPath}/static/images/*.jpg`,
    `!${srcPath}/static/images/*.png`,
  ],
  lessPath: [ // less blob
    `${srcPath}/**/**/*.less`,
  ],
  jsPath: [ // js blob
    `${srcPath}/**/**/*.js`,
  ],
  wxmlPath: [ // wxml blob
    `${srcPath}/**/**/*.wxml`,
  ],
  jsonPath: [ // json blob
    `${srcPath}/**/**/*.json`,
  ],
  lessImportPath: [
    `${srcPath}/common/less/*.less`
  ],
  iconPath: [
    `${srcPath}/static/icons/*.jpg`,
    `${srcPath}/static/icons/*.png`
  ],
  imagePath: [
    `${srcPath}/static/images/*.jpg`,
    `${srcPath}/static/images/*.gif`,
    `${srcPath}/static/images/*.png`
  ]
}
# gulp 开发流程
主要流程如下:
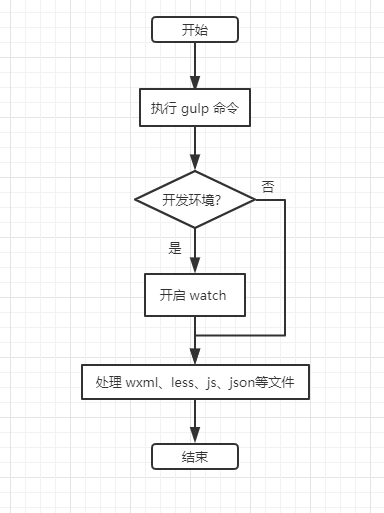
# gulp 的各个任务:(taskControler.js 文件)
每次进行 gulp 任务前都要清空 dist 打包后的目录。主要代码如下:
task("clean:dist", done => {
    // console.log(":::: clean:dist");

    src(baseConfig.distPath, {
        read: true,
        allowEmpty: true,
    })
        .pipe(clean())

    done();
})
但是,上面这样处理会有问题:第二次运行 gulp 命名的时候会有文件权限等问题。故:dist 文件的处理通过 nodejs 进行处理。
// gulp-clean 清空 dist 命令会有权限等一系列问题,故:直接用 node 进行删除 dist
const path = require("path");
const chalk = require("chalk");
const rimraf = require("rimraf");

const distPath = path.resolve(__dirname, '../dist');
rimraf(distPath, err => {
  if (err) {
    console.log(chalk.red(err));
  }
})
然后在 package.json 中配置脚本命令:
"scripts": {
    "build:dev": "node gulpTask/clean.js && gulp dev --development",
    "build:prod": "node gulpTask/clean.js && gulp prod --production"
},
这样每次执行 gulp 命令前都会删除 dist 目录。
处理 less 文件。需要解决的问题有:
- 开发环境不压缩代码,生产环境压缩代码;
- 自动添加属性前缀,autoperfixer;
- 将 less 文件的后缀更改为 wxss;
- 将 less 文件内部的 @import 引用文件的后缀更改为 wxss。
主要代码如下:
task("compile:less", done => {
    // console.log(":::: compile:less");

    src(baseConfig.lessPath, {
        base: "src"
    })
        .pipe(changed(baseConfig.distPath))
        .pipe(gulpif(!this.isDev, cleanCss()))
        .pipe(autoprefixer())
    // .pipe(less({
    //   paths: baseConfig.lessImportPath,
    //   plugins: [autoprefix]
    // }))
        .pipe(rename(function (path) { // 更改 .less 文件后缀为 .wxss
        path.extname = ".wxss";
    }))
        .pipe(replace(/\.less/g, ".wxss")) // 修改 less 文件内部的引用 .less 文件后缀为 .wxss
        .pipe(dest(baseConfig.distPath));

    done();
})
这里遇到一个坑,用 less-plugin-autoprefix @import 会有问题,@import 语句会被删除。后面改用 gulp-autoprefixer。
处理 js 文件。需要解决的问题有:
- eslint 代码格式检查;
- 开发环境不压缩代码,生产环境压缩代码;
主要代码如下:
task("compile:js", done => {
  // console.log(":::: compile:js");

  src(baseConfig.jsPath, {
      base: "src"
    })
    .pipe(changed(baseConfig.distPath))
    // .pipe(babel({ // 先通过 babel 转化语法然后才能进行压缩 --> 微信开发者工具有 es6 转 es5 功能
    //   presets: ["@babel/env"]
    // }))
    .pipe(eslint())
    // .pipe(eslint.format())
    .pipe(gulpif(!this.isDev, uglify()))
    .pipe(dest(baseConfig.distPath));

  done();
})
这里原本加了 babel 进行 es6 到 es5 的转化,但是微信开发者工具本身就有这个功能,故去除。另一个坑是,用 gulp-uglify 不能进行 es6 代码的压缩,要用 gulp-uglify-es 。
处理 wxml 文件。需要解决的问题有:
- 开发环境不压缩代码,生产环境压缩代码;
主要代码如下:
task("compile:wxml", done => {
  // console.log(":::: compile:wxml");

  src(baseConfig.wxmlPath, {
      base: "src"
    })
    .pipe(changed(baseConfig.distPath))
    .pipe(gulpif(!this.isDev, htmlmin({
      collapseWhitespace: true
    })))
    .pipe(dest(baseConfig.distPath));

  done();
})
处理 json 文件。需要解决的问题有:
- 开发环境不压缩代码,生产环境压缩代码;
主要代码如下:
task("compile:json", done => {
  // console.log(":::: compile:json");

  src(baseConfig.jsonPath, {
      base: "src"
    })
    .pipe(changed(baseConfig.distPath))
    .pipe(gulpif(!this.isDev, prettyData({
      type: "minify",
      preserveComments: true,
      extensions: {
        "json": "json",
      }
    })))
    .pipe(dest(baseConfig.distPath));

  done();
})
其他所有文件。
主要代码如下:
task("compile:other", done => {
      // console.log(":::: compile:other");

      src(baseConfig.otherPath, {
          base: "src"
        })
        .pipe(changed(baseConfig.distPath))
        .pipe(dest(baseConfig.distPath));

      done();
    })
图片压缩。
主要代码如下:
task("minify:image", async done => {
  // console.log(":::: minify:image");

  src(baseConfig.imagePath, {
      base: "src"
    })
    .pipe(imagemin([imagemin.optipng(), imagemin.gifsicle(), imagemin.jpegtran()]))
    .pipe(dest(baseConfig.distPath))

  done();
})
开发环境开启监控 watch。
主要代码如下:
task("watch", done => {
  // console.log(":::: compile:other");

  watch(baseConfig.basePath, {
    base: "src"
  }, series("compile:less", "compile:js", "compile:wxml", "compile:json", "compile:other", "minify:image"))

  done();
})
最后,将任务进行 id 绑定处理,还有不同环境的区分。主要代码如下:
task("default", parallel("compile:less", "compile:js", "compile:wxml", "compile:json", "compile:other", "minify:image"));
task(`dev-${id}`, series("default", "watch"));
task(`prod-${id}`, series("default"));
# gulp 入口文件处理:(gulpfile.js 文件)
主要是对不同环境的区分,还有 taskControler.js 定义的各个任务进行引用。主要代码如下:
const {
  task,
  series
} = require("gulp");
const TaskControler = require("./gulpTask/taskControler");
// 项目 ID
const id = require("./package.json").name || "min-program";

new TaskControler(id);

/*---------- 相关的 gulp 任务 ----------*/

// dev 开发环境任务
task("dev", series(`dev-${id}`));

// prod 生产环境任务
task("prod", series(`prod-${id}`));
接着,只需要执行 npm run build:dev或 npm run build:prod,然后将生成的 dist 目录丢到微信开发者工具即可。
# 路由封装
路由表文件
/**
 * 路由路径
 */
const routerPath = {
  index: "/pages/index/index",
  detail: "/pages/detail/detail",
}

module.exports = routerPath;
路由逻辑处理
最后使用路由的方式为:
app.Router.push({
    path: 'detail',
    query: {
        name: 'Ertsul',
        age: 23
    }
})
需要处理的问题有:路由参数转化为小程序的格式、有参无参路由。
路由参数转化为小程序的格式。
/**
 * 处理路由参数,拼接成字符串形式
 * @param {*} queryObj : 路由参数
 */
function dealQuery(queryObj) {
  let tempArr = [];
  for (let key in queryObj) {
    if (queryObj.hasOwnProperty(key)) {
      const value = queryObj[key];
      const item = `${key}=${value}`;
      tempArr.push(item);
    }
  }
  return "?" + tempArr.join("&");
}
封装一个对象,添加 push 对外暴露的方法,添加内部跳转的方法。
let Router = {
  /**
   *
   * @param {String} param0 : 路径
   * @param {Object} param1 : 参数
   * @param {String} param2 : 类型,redirectTo/reLaunch/back/navigateTo
   */
  push({
    path = "",
    query = {},
    type = "navigateTo"
  }) {
    if (!path) {
      return;
    }
    // 获取对应的小程序路径
    let url = routerPath[path] || routerPath['index'];
    let params = "";
    // 处理 query
    if (Object.keys(query) && Object.prototype.toString.call(query) == '[object Object]') {
      params = dealQuery(query);
    } else {
      console.error("路由参数类型错误!");
      return;
    }
    url += params;
    this.to(url, type); // 执行跳转
  },
  /**
   *
   * @param {*} url : 路径 + 参数
   * @param {*} type : 类型,redirectTo/reLaunch/back/navigateTo
   */
  to(url, type = "") {
    switch (type) {
      case "redirectTo":
        wx.redirectTo({
          url
        });
        break;
      case "reLaunch":
        wx.reLaunch({
          url
        });
        break;
      case "back":
        wx.navigateBack({
          delta: 1
        });
        break;
      case "navigateTo":
        wx.navigateTo({
          url
        });
        break;
    }
  }
}
最后将 Router 对象挂载到 app 对象。
const Router = require("./router/router");

//app.js
App({
  Router,
  ...
})
# http 封装及其接口统一管理
http 封装,可以添加一些请求公共参数等。核心代码为:
function request({
  url = '',
  data = {},
  method = 'POST',
  header = {
    'content-type': 'application/json' // 默认值
  }
}) {
  return new Promise(async (resolve, reject) => {
    wx.request({
      url,
      data,
      method,
      header,
      success(res) {
        resolve(res);
      },
      fail(err) {
        reject(err);
      }
    })
  })
}
接口统一管理。接口统一管理有利于后期维护。
const request = require('../http/request');
const baseConfig = require('../http/baseConfig');

// get 例子
const getList = request({
  method: 'GET',
  url: baseConfig.baseUrl + '/list?page=1&size=10',
})

// post 例子
const updateInfo = request({
  method: 'POST',
  url: baseConfig.baseUrl + '/updateInfo',
  data: {
    name: 'Ertsul',
    age: 23
  }
})

module.exports = {
  getList,
  updateInfo
}